
KitchenAid K5A Bowl Lift & Arm Won't Raise — What Parts Fix This?
Need the replacement part? Search your model number at for guaranteed fit and fast free shipping.
Understanding the Problem
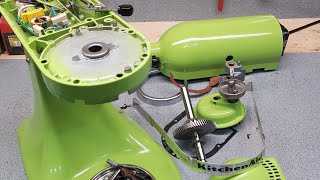
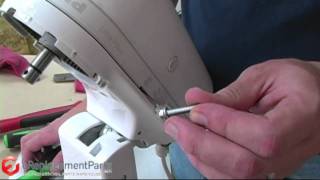
Brief explanation: The K5A (bowl-lift KitchenAid) uses a lift cam, lift gears (worm/drive), lift shaft and linkages to raise and lower the bowl and lock the mixing head position. When the arms or bowl won’t raise, won’t lock, or grind when you try, the issue is almost always worn or broken lift gears, a stripped cam, broken lift spring, seized pivot, or missing/contaminated grease. Step-by-step diagnostic and repair steps: 1) Observe symptom and power off: Unplug the mixer. Manually try to raise the bowl using the lift handle to feel resistance, grinding, or slipping. Note any metal shavings or heavy play. 2) Remove outer housing: For K5A-style mixers remove the motor housing/top cover (usually 2–4 screws) and the rear cover so you can see the bowl lift mechanism and gear train. Keep screws and small parts organized. 3) Inspect linkages and springs: Check the lift lever, return spring, and pivot pins for breaks, missing clips, or excessive play. A broken or missing spring can prevent lift action. 4) Check gear engagement: With the cover off, rotate the lift lever and watch the worm/drive gear and cam. Look for stripped teeth, cracked gears, gouges, or heavy wear on the cam lobes. 5) Look for contamination and lubrication issues: Old hardened grease, metal shavings, or debris can jam the mechanism. Clean out old grease and debris to see if the mechanism frees up. 6) Test shaft and bushings: Excessive shaft end-play or worn bushings will cause misalignment and skipping. Wiggle the lift shaft; if it moves laterally, bushing replacement or a new shaft assembly may be needed. 7) Replace worn parts: If you find stripped gears, cracked cam, broken spring, or worn bushing, order the appropriate replacement parts (lift gear, cam, lift shaft, spring kit). Replace the part(s) rather than trying to patch stripped plastic gears—patched gears rarely last. 8) Re-grease properly: After replacing worn parts, use a high-quality appliance/white lithium grease or food-safe gear grease for mixers (follow OEM recommendation). Pack the gear teeth and cam lobes but avoid getting grease on electrical parts or painted surfaces. 9) Reassemble and test: Reinstall covers and run the mixer empty through lift cycles and a short mix to confirm smooth operation and no grinding or sticking. 10) Final check and safe use: Verify bowl raises and locks solidly, and the tilt-lift mechanism holds under load. How to fix (practical repair steps): - If gears are stripped: remove the gear cover, remove retaining clips/screws, take out the worn gear(s) and replace with new OEM or high-quality aftermarket gears. Ensure alignment keys and pins seat correctly. - If the lift cam is cracked: remove the cam retaining fastener, replace cam, and inspect mating surfaces for wear; replace mating gear if worn. - If pivot/bushings are worn: replace bushings or entire lift shaft as one assembly to restore alignment. - If spring is broken or missing: replace the bowl lift spring and confirm correct tension and routing. Safety note: Always unplug the mixer before disassembly. Be careful with small springs and retaining clips (they can fly off). If you’re not comfortable working around the motor or electrical parts, consider a professional repair.
Common Symptoms
Bowl or arms won't raise or lock, grinding or slipping when lifting, visible stripped gear teeth, excessive play in lift lever, mixer head won't stay in position.
Common Causes
- Stripped or worn lift worm gear or mating gear
- Broken or missing bowl-lift spring or latch components
- Hardened/contaminated grease or debris jamming the mechanism
- Worn lift shaft bushings or misaligned linkage
Popular Parts That Fix This Problem
These are the most common replacement parts that fix this problem. When you're ready to order, click below to find the right part at PartsDiscount.com — just search by your appliance model number for a guaranteed fit.

Helpful Repair Tip
With the top cover removed, manually operate the lift lever and watch the worm/drive gear engagement: if the worm spins but the mating gear slips or teeth slide under load, the mating gear is stripped — replace the gear set.
Frequently Asked Questions
Can I repair a K5A bowl lift myself?
Yes — if you have basic hand tools and are comfortable removing covers and small parts. Diagnose by watching the gears with the cover off, and replace any stripped gears, broken springs, or worn bushings. Unplug the mixer before starting. If you’re unsure about parts alignment or motor disassembly, a pro is safer.
How much does it cost to fix the bowl lift on a K5A?
Parts alone (gear set, spring, or cam) typically range from modest to moderate cost depending on source; expect parts to be the bulk of the expense for a DIY repair. Professional repair labor will add more. If multiple components are worn (gears + shaft/bushings), repair cost rises and replacement may be considered depending on mixer age.
Related How-To Videos


Real DIY Repair Stories
Be the first to share your repair story!
Share Your Repair Story
Your experience helps other homeowners fix their appliances. Tell us how it went!
Can't Fix It Yourself? Find a Local Technician
It's perfectly okay to call a professional. Some repairs require specialized tools, deep teardowns, or dealing with complex systems that are better left to the pros.
Find the Right Part for Your Appliance
Don't guess — search your exact appliance model number at PartsDiscount.com to find the correct OEM compatible replacement part. They offer fast free shipping, guaranteed fit, and thousands of parts in stock.
Your Free Parts Videos
Whether your dishwasher won't drain, your dryer stopped heating, or your fridge isn't cold, we've created simple repair guides for the most common appliance problems homeowners face. Each guide explains what's going wrong, the most likely causes, and which replacement parts fix the issue. When you're ready to order, we link directly to PartsDiscount.com where you can search by model number and get the right part shipped fast.